Header Ads

Read: How to set up Huawei WiFi 6+ AX3 Router?

OPPO
Infinix
In this article, we share the quick and easy step-by-step procedure of how to set up the new Huawei WiFi 6+ AX3 Router.
desk placement
Huawei WiFi 6+ AX3 desk placement

Huawei brought the Huawei WiFi 6+ AX3 Router back in February. To recap, the new router features a 1.4GHz quad-core Gigahome processor that allows for up to 160MHz bandwidth and allows the router to connect up to 128 devices on both the 2.4GHz and 5GHz bands. 

In our unboxing and first impressions, we were impressed by its design and build quality. We also like the added Huawei Share tap area support and the H-button for easy device pairing.

It is priced at PHP 3,999 and is now available in the Philippines.

Quick and easy step-by-step guide:

Rear port view
Rear port view

Step 1 - Open the box and make sure that the inclusions are complete with the router, AC power adapter with cable, Ethernet to Ethernet cable, and the quick start guide.

Step 2 - Plug the power-in plug into the power port at the back of the router. Then plug the Ethernet Cable connected to your Internet service provider modem to the WAN port of the WiFi 6+ AX3 router.

Step 3 - Plug the router into the power outlet and wait for the router to start up automatically. While waiting for the router to start up, download the Huawei AI Life app from the Google Play Store.
If you open the Huawei AI life app

Step 4 - Once installed, open the Huawei AI Life. If the Huawei WiFi 6 AX3 is turned on, the app may be able to automatically detect the router. 
If not, you can manually scan a Huawei device

If the app was not able to automatically detect the router, users can simply tap on the "+" (or add) button. It will then scan the area for Huawei devices. Once detected, tap the "connect" button that corresponds to the device you want to add to the Huawei AI Life app.
Terms and conditions

Step 5 - Tap on the check box of the "I agree to the End User License Agreement" and tap "Get Started". 
WiFi settings
WiFi settings

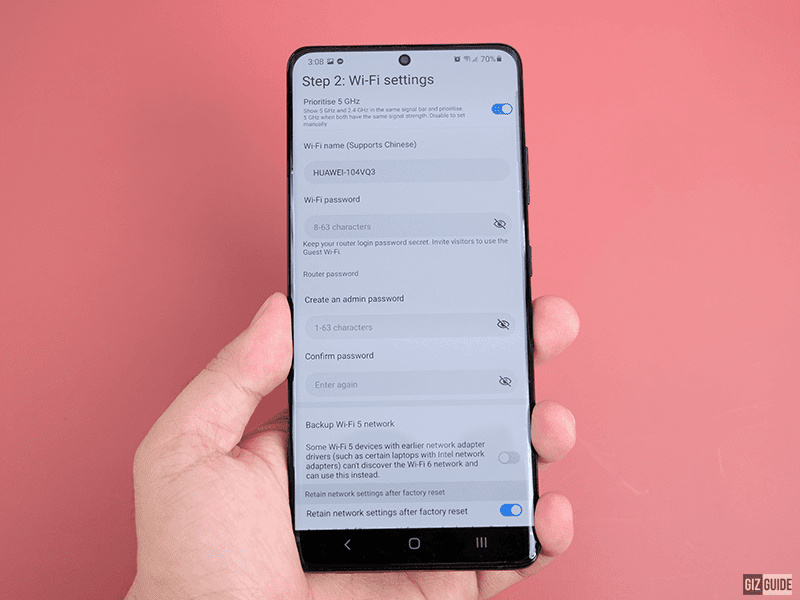
Step 6 - Up next is the WiFi settings where users can personalize the router's name, WiFi password, and admin passwords. Type in the name you want the router to appear on other devices, the password for connecting to the network, and the admin password for modifying and controlling the router's features.

If you and the other people will use devices that do not natively support WiFi 6, tap and turn on the "Backup WiFi 5 network." This will allow older devices to detect the router's WiFi 6 network.
Added feature
Added feature

An added feature is the router can retain the network settings after the factory resetting the router.
Confirmation
Confirmation

Step 6 - The router will confirm the WiFi name and the passwords you chose and you are given the option to connect to your new WiFi. You are now done with the set-up and you can now connect to the router.
You can choose 

Bonus: Once set up and connected, you can see all the parameters of the router as well as further control the router. You just need to log in using the admin password you set up earlier. You are free to see all the devices that are connected as well as modify settings on the fly using the Huawei AI Life.

And that is it. You can quickly and safely set up the Huawei WiFi 6+ AX3 router in six easy steps.

For those who are interested, again, the WiFi 6+ AX3 router is priced at PHP 3,999 and is now available in the Philippines.


What do you guys think?

No comments

Powered by Blogger.
close
gizguide